How to Create and DIY a Solar System for Your House
1. Determining Your Energy Needs
Analyze Your Electricity Usage
Start by examining your electricity bills over the past year to understand your energy consumption. This will help you determine the size of the solar system you need. If you’re planning an off-grid system, list all your electrical appliances and their power ratings to calculate your total energy requirements. For a comprehensive list of appliance wattages, refer to our appliance power consumption guide.
2. Selecting the Correct Wattage
Calculate Daily Energy Consumption
Sum up the wattage of all your appliances and multiply by the number of hours you use them daily. For example, if you have a 100W light bulb running for 5 hours a day, it consumes 500Wh daily. Repeat this for all appliances to get your total daily energy consumption.
Consider System Losses
Inverters and other system components have efficiency losses, typically around 10-15%. Add this to your total energy requirement. For instance, if your daily consumption is 16,750Wh, you should size your system for approximately 18,425Wh to account for inefficiencies.
3. Choosing Solar Panels
Types of Solar Panels
There are two main types of panels – monocrystalline and polycrystalline. Monocrystalline panels are more efficient and have a higher cost, while polycrystalline panels are less efficient but cheaper. Monocrystalline panels are ideal for those with limited roof space due to their higher efficiency. For more information on panel types, visit our solar panels page.
Panel Wattage and Quantity
Decide the wattage of each panel (e.g., 300W). Divide your total daily energy requirement by the panel wattage to determine the number of panels you need. For example, 18,425Wh daily requirement divided by 300W panels equals about 62 panels. Check out our solar panels to find the right fit for your needs.
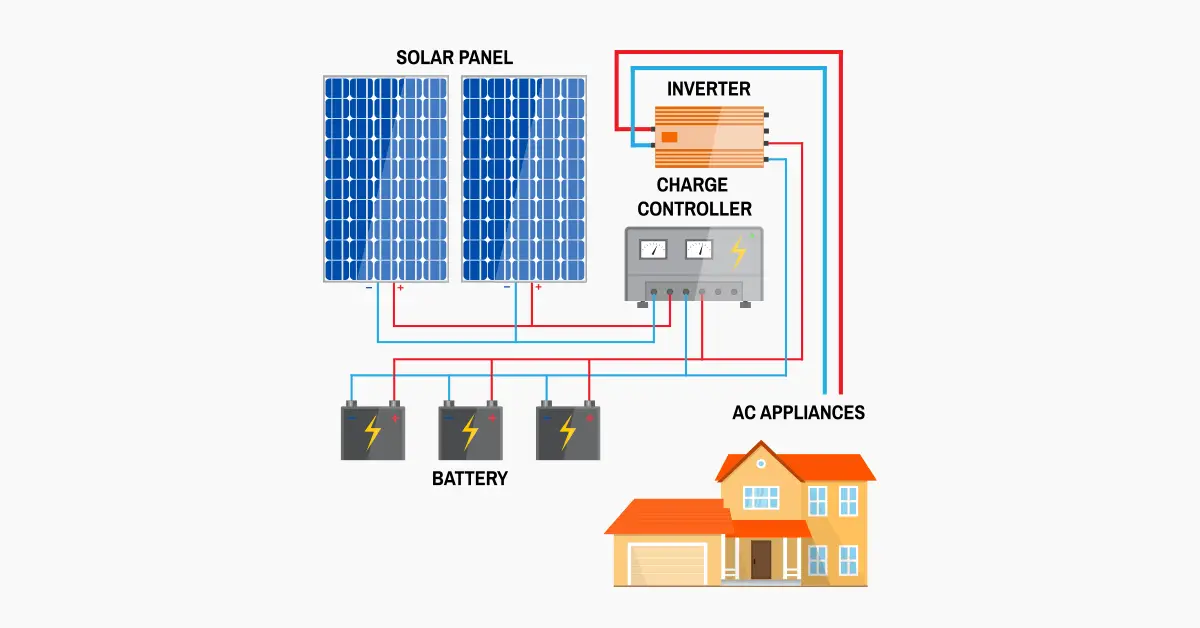
4. Essential Components
Inverters
Convert DC from the panels to AC used by household appliances. Pure sine wave inverters are recommended for their efficiency and compatibility with most home electronics. Explore our inverter options.
Batteries
Store energy for use when sunlight isn’t available. Lithium-ion batteries are preferred for their efficiency and long lifespan. Calculate the total battery capacity required based on your daily consumption and desired days of autonomy (e.g., 3 days of backup). Browse our battery storage solutions.
Charge Controllers
Regulate the voltage and current coming from the solar panels to the batteries, preventing overcharging and extending battery life. Find the right charge controller for your setup.
Mounting Systems
Secure your solar panels using roof or ground mounting systems. Ensure they are installed at the optimal angle to maximize sunlight exposure. Check out our mounting options.
5. Purchasing Equipment
Solar Panel Kits
These kits include solar panels, inverters, batteries, and mounting hardware. They simplify the process and ensure compatibility between components. Visit our complete solar kits for comprehensive solutions.
6. Installation Process
Site Assessment
Identify the best location for your panels, ensuring maximum sunlight exposure and minimal shading. Consider factors like roof angle, direction, and potential obstructions.
Mounting Solar Panels
Whether on your roof or the ground, secure the panels using appropriate racking systems. For roof installations, ensure the racking is securely attached to the rafters to prevent damage from wind and other elements. Explore our mounting options.
Wiring and Inverters
Connect the panels to the inverters. For systems with microinverters, attach each microinverter to a panel before mounting. For string inverters, connect all panels in series or parallel to the inverter. Follow the wiring diagrams provided with your equipment for proper installation.
Battery Installation
Place batteries in a well-ventilated area. Connect them to the charge controller and inverter, following the manufacturer’s wiring diagrams.
7. Safety and Compliance
Permits and Regulations
Check local regulations and obtain necessary permits. Some areas require professional inspection and approval before and after installation. Ensure your installation meets local building codes and safety standards.
Safety Measures
Always follow safety protocols. Wear appropriate protective gear and ensure all electrical connections are secure and compliant with the National Electrical Code (NEC). Use insulated tools and avoid working on live circuits.
8. Monitoring and Maintenance
System Monitoring
Use monitoring systems included with your inverter to track performance and identify issues. Regularly inspect panels for dirt and debris, and clean them as needed to maintain efficiency.
Battery Maintenance
For lead-acid batteries, regularly check and maintain electrolyte levels. Lithium-ion batteries require less maintenance but should be monitored for performance and replaced as needed.
9. Economic and Environmental Benefits
Cost Savings
Installing a solar system can significantly reduce your electricity bills. Calculate your potential savings by comparing your current electricity costs with the estimated output of your solar system. Over time, the system can pay for itself through reduced energy costs.
Environmental Impact
Solar energy is a clean, renewable resource that reduces your carbon footprint. By generating your electricity, you help reduce greenhouse gas emissions and dependence on fossil fuels. This contributes to a healthier environment and combats climate change.
10. Tips for Successful DIY Solar Installation
Plan Thoroughly
Careful planning is crucial for a successful solar installation. Make sure to accurately calculate your energy needs, choose the right components, and follow all safety guidelines.
Use Quality Components
Investing in high-quality solar panels, inverters, batteries, and mounting systems ensures the longevity and efficiency of your solar system. Check warranties and reviews before purchasing.
Seek Professional Help if Needed
If you’re unsure about any aspect of the installation, don’t hesitate to seek professional help. A licensed electrician or solar installer can ensure your system is safe and efficient.
By following these steps, you can successfully install a DIY solar system tailored to your energy needs. Visit Crisis Comforts for all the products and tools you need to create an efficient and reliable solar power system for your home.